

Souvereignty: Core infrastructure
We’ve forgotten how to build things ourselves.
The public cloud is like a dealer: you pay for what you need, when you need it. It’s very convenient, but you’re trapped. Trapped in their ecosystem, their rules, their pricing, their price bumps. Escaping that trap requires some serious planning. It’s about answering the hard questions: What hardware do you use? What do you repurpose, what do you buy? Which stack do you trust? How do you manage it all? And most importantly: What are the principles you refuse to compromise on?
For me, it started with two machines: a Synology NAS and a Lenovo M700 mini PC. The Synology for storage, the Lenovo for services. But the Synology turned out to be more than just storage—it came with features I didn’t even know I needed. An old APC SmartUPS completed the set of hardware involved.
The Synology: More Than Just Storage
Certificate Management
I need to expose multiple services to the internet, and Let’s Encrypt has limits on how many certificates you can register per domain. The solution? Create Multi-SAN certificates, in which multiple services (e.g. git.vd-sande.nl, vpn.vd-sande.nl) are covered by a singe certificate.
The Synology takes care of the following things:
- Automatically registers and renews certificates via Let’s Encrypt.
- No manual hassle, no risk of downtime because I forgot to renew.
Why not do this on the Lenovo?
I could. Tools like Nginx Proxy Manager or Traefik can handle it. But the Synology already does it well, and I’m going for convenience here. If it works, don’t overcomplicate it.
Reverse Proxy
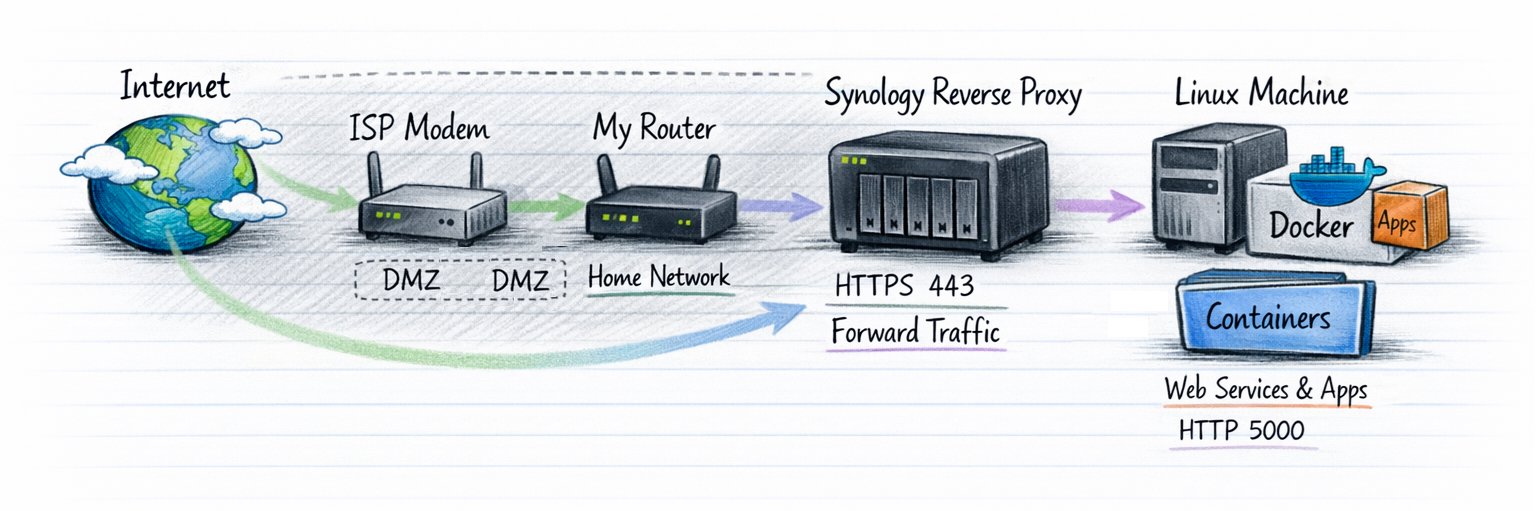
The Synology acts as the gateway for all my services:
- Exposes port 443 to the outside world.
- Handles SSL termination (offloading the encryption/decryption work).
- Forwards traffic to the Lenovo, where the actual services run.
Why not run the reverse proxy on the Lenovo? Again, I could. But the Synology’s built-in reverse proxy is good enough, and it keeps the attack surface smaller. Fewer exposed services on the Lenovo means less risk.
Email Services (Future Project)
I want my own email server. In which I have full control, no Google, no Microsoft. But I’m still deciding:
- Self-hosted? Running a mail server can be a pain (IP reputation, spam filters, maintenance).
- Hosted elsewhere? Maybe, but then I’m back to trusting someone else.
For now, this is a later concern. I’m focusing on the core infrastructure first.
Building the Lenovo: The Workhorse
Hardware Upgrade
The Lenovo M700 came with a crappy M.2 Phison SSD. Not reliable, not fast. So I swapped it for a Samsung EVO 870 SATA SSD.
- Why SATA? It’s slower than NVMe, but it’s reliable and affordable.
- Why Samsung? Trusted brand, good track record. No need to cheap out on storage.
OS Choice: Debian Trixie (No GUI)
- Why Debian?
- Stability: It just works.
- Speed: No bloat, no unnecessary services. In case of a reboot, the system is up again within 10 seconds.
- Familiarity: I’ve used Debian-based systems for years. No learning curve.
I could’ve gone with ProxMox, Ubuntu, Fedora, or even Alpine. But Debian fits my needs: stable, fast, and out of my way.
Docker CE: The Defacto Standard
I know, I know… “Why Docker? Podman is better!”
- Docker is the standard. Most documentation, most tools, most community support.
- Podman is great, but I’m not here to fight religious wars. I’m here to get things done.
Docker CE lets me:
- Run containers for all my services (Gitea, blog, etc.).
- Manage everything with
docker-compose. - Keep my services isolated, portable, and easy to back up.
The reason why I don’t run Kubernetes on my environment is that I want to keep the overhead to a minimum. The number of workloads that I’m going to run do not justify the additional overhead involved. If I was going to run a cluster, Kubernetes would have a no-brainer for me. Instead of having to rely on namespaces for workload isolation, I’ll have to rely on multiple user accounts and isolated networks on the Docker environment.
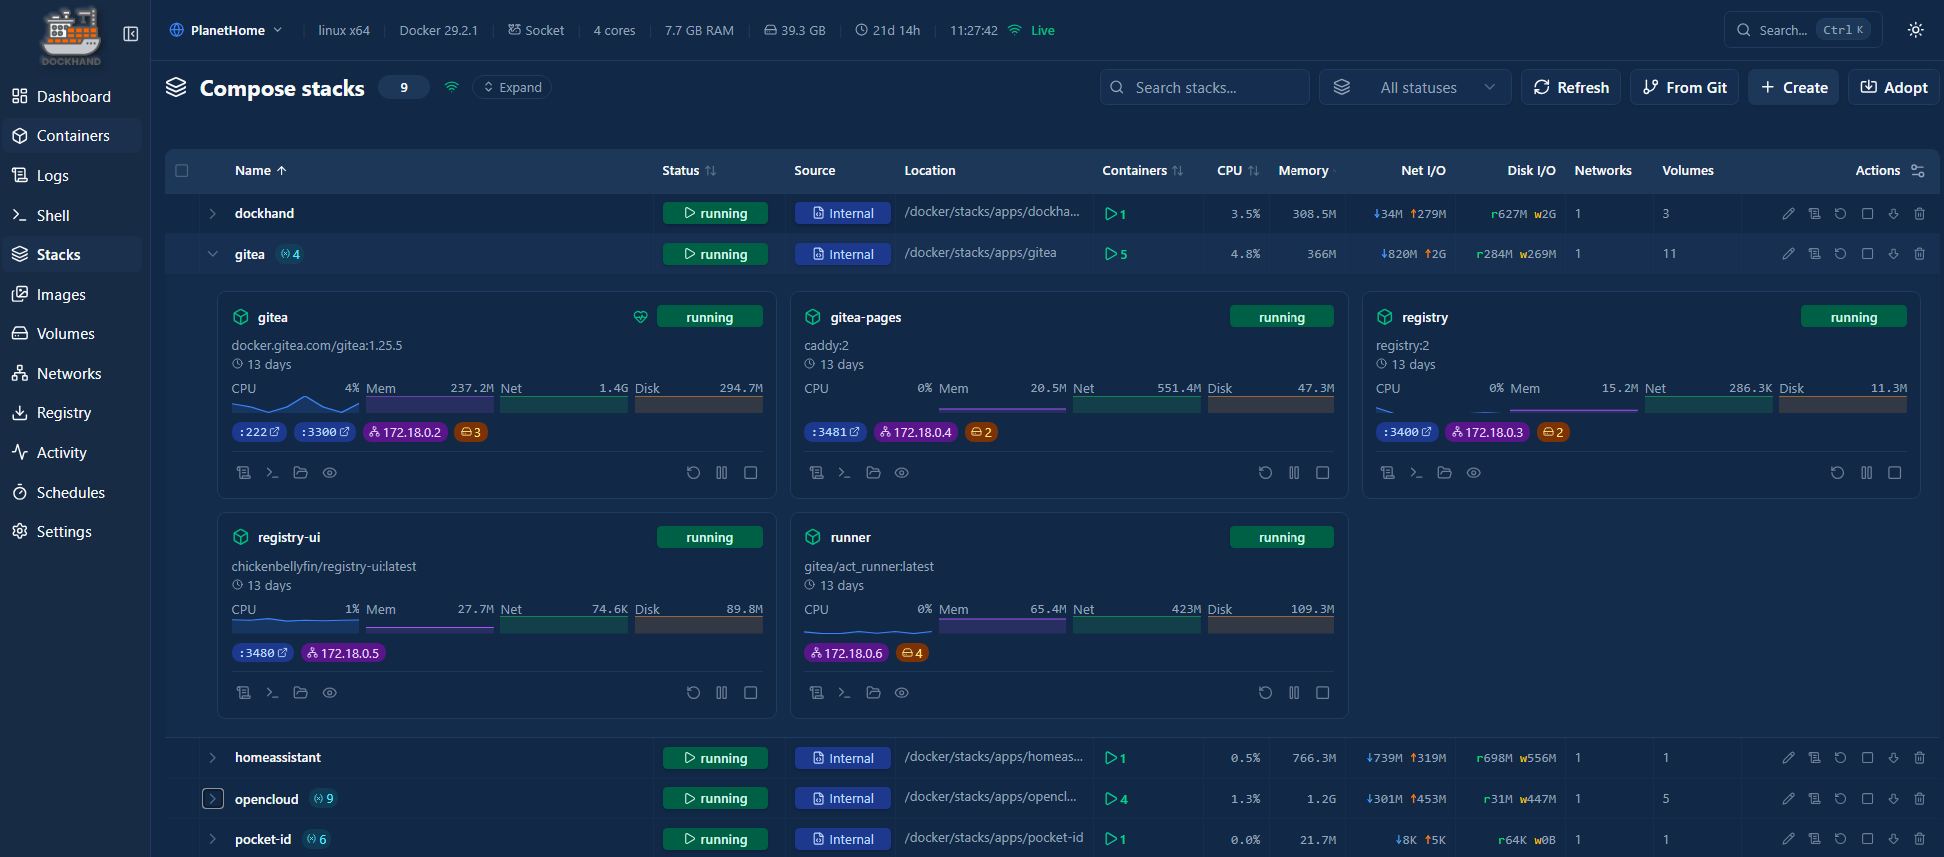
Managed by a tool called Dockhand, a webbased interface in which I can manage the workloads.
Ensure continuity
The next thing that needs to be ensured is continuity. Continuity comes in multiple ways. Uninteruptable Power Supply (UPS) for power surges, Wake on lan (in case power restored). I happened to have a APC SmartUPS and decided to hook it up to the Synology. The UPS is capable of keeping the network alive for 33 minutes with everything running. We want to prevent that the power drops, so we will power the Synology down gracefully in case there is a power failure that takes more than 10 minutes. I configured the Synology to act as an UPS NUT server. After the 10 minutes interval it will notify the NUT clients in the network to power themselves of, preventing drives from corrupting. Once the machines are down, the Synology follows.
Elegant and maintenance free. By using the 10 minute threshold, we always stay in the safe zone.
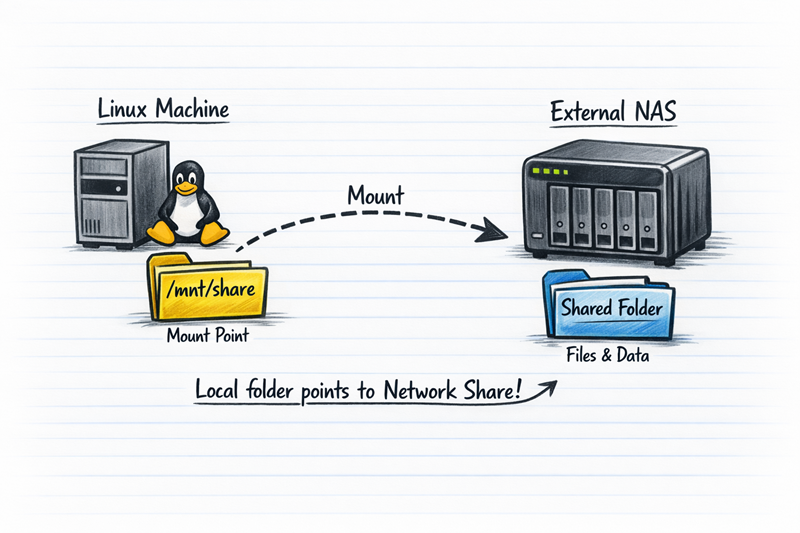
Bridging Storage and Services
One of the key aspects of my setup is how my Lenovo accesses the storage on my Synology NAS. Instead of treating them as separate islands, I mount the Synology shares directly onto the Lenovo as local mount points. This allows my Docker containers and services to seamlessly read and write data to the NAS, while keeping the actual storage centralized and safe.
Why Mounting?
Before diving into the “how,” let’s talk about the “why”:
- Centralized Storage: All my important data lives on the Synology, which is backed up to OVH S3. By mounting shares on the Lenovo my services can access this data without duplicating it.
- Flexibility: If I need to move a service to another machine, the data stays in place. I just remount the share on the new machine.
- Performance: The Synology handles the storage, while the Lenovo focuses on running services. No need to waste disk space or CPU cycles on the Lenvo for storing large files.
- Backups: Since the data lives on the Synology, it’s automatically included in my Hyper Backup routine to OVH S3. No extra backup steps needed.
How It Works: NFS vs. SMB I considered both NFS and SMB for mounting the shares. Here’s why I went with NFS:
NFS (Network File System):
- Pros: Faster performance (especially for small files), lower overhead, and better suited for Linux-to-Linux communication.
- Cons: Less secure by default (no built-in encryption), and requires a bit more setup.
- My Choice: Since both my Synology and “calculon” are on my local network, and I trust my firewall rules, NFS was the obvious pick for speed and simplicity.
SMB (Server Message Block):
- Pros: More secure out of the box (supports encryption), and works well in mixed environments (Linux/Windows).
- Cons: Slightly slower, especially for Docker workloads that read/write frequently.
- When I’d Use It: If I ever need to share files with Windows machines or access data remotely, I’d switch to SMB.
Step-by-Step: Making the first NFS mount on Debian
Here’s how I mounted my Synology shares on the Lenovo:
1. Enable NFS on the Synology:
- Open Control Panel > File Services > NFS.
- Create a new NFS rule for the share you want to mount (e.g.,
/volume1/docker-data). - Set the privileges to Read/Write and specify the IP of the Lenovo, e.g.,
192.168.1.32). - Enable Asynchronous I/O for better performance (but be aware of the trade-offs in data consistency).
2. Install NFS Tools on “calculon”:
sudo apt update
sudo apt install nfs-common
3. Create a Mount Point on “calculon”:
sudo mkdir -p /mnt/synology/docker-data
4. Mount the Share Temporarily (for testing):
sudo mount -t nfs <synology-ip>:/volume1/docker-data /mnt/synology/docker-data
Replace <synology-ip> with the actual IP or nameof your Synology NAS.
5. Verify the Mount:
df -h
You should see your Synology share listed as a mounted filesystem.
6. Make It Permanent with /etc/fstab:
Edit /etc/fstab and add the following line:
<synology-ip>:/volume1/docker-data /mnt/synology/docker-data nfs defaults 0 0
Then run:
sudo mount -a
This ensures the share is mounted automatically at boot.
Docker and Mounted Shares: A Match Made in Heaven
Now that the share is mounted, I can use it directly in my Docker containers. For example, my Gitea container stores all its repositories and data on the Synology share. Here’s how I set it up in my docker-compose.yml:
services:
  gitea:
    image: gitea/gitea:latest
    volumes:
      - /mnt/synology/docker-data/gitea:/data
    ports:
      - "3000:3000"
    restart: unless-stopped
This way:
- The actual data lives on the Synology (and is backed up).
- The Docker container on the Lenovo reads/writes to it as if it were local storage.
- If I ever need to move Gitea to another machine, I just remount the share and point the container to the same path.
Potential Pitfalls and Fixes
Of course, nothing is perfect. Here are a few issues I ran into—and how I fixed them:
1. Permission Issues:
- Docker containers often run as a specific user (e.g.,
gitfor Gitea). If that user doesn’t have write permissions on the mounted share, you’ll run into errors. - Fix: Adjust the permissions on the Synology share to match the user ID (UID) of the container user. You can find the UID with:
Then, set the same UID on the Synology share’s permissions. You might need to create a user with the same UID on the Lenovo as well.id <container-user>
2. NFS Timeouts:
- If the network blips, NFS can hang and cause Docker containers to freeze.
- Fix: Add
soft,timeo=3,retrans=2to the/etc/fstabmount options to make NFS less aggressive about retries:<synology-ip>:/volume1/docker-data /mnt/synology/docker-data nfs soft,timeo=3,retrans=2 0 0
3. Performance Bottlenecks:
- NFS over a slow network (e.g., Wi-Fi) can be sluggish for Docker workloads that read/write frequently.
- Fix: Use a wired connection for both the Synology and “calculon,” and enable Jumbo Frames if your network supports it.
Conclusion: Building What You Own
In the end, digital sovereignty isn’t about chasing perfection, it’s about ownership. You assemble an infrastructure that belongs to you, that you understand, and that won’t crumble the moment something changes. This is an initial setup, in which I describe the foundation: a platform on which new services, experiments, and ideas can grow without disturbing existing workloads. This will allow that you choose the systems that serve you, rather than systems you must serve.
The journey just started. In the next article I’ll be using the priciples I described to build my OneDrive replacement.